
How to Play Wonderwall on Guitar: Chords, Structure and Strumming
The song we’re going over today is Wonderwall.
If you clicked on this you probably already know that, and you might already know a couple of chords. So I’m not going to dive too deep on the chords themselves. What I am going to show you is the song’s structure, and give you a good vibe check so you can establish whether or not you should play this one out.
My name is Mike, and I’m joining Ben here at Intermediate Guitar to help bring you tutorials on how to play music you love.
Fair warning on this one: the chords will take you an afternoon. The rhythm will take you longer than that, and the rhythm is the whole song. We’ll get to that.
The party chords
We’re going to play some pretty familiar chords. I like to call these party chords, because if you pick up a guitar you can do this song open or with a capo and it doesn’t matter.
You just have to know how to keep your fingers down here in the same place and move your top ones around. That’s the whole trick to this song.
We’re playing with a capo on the second fret, and all the fret numbers below are counted from the capo, not from the nut.
Look at the top two strings on all four of those. Your ring and pinky sit on the 3rd fret and never move. Not once, the entire song.
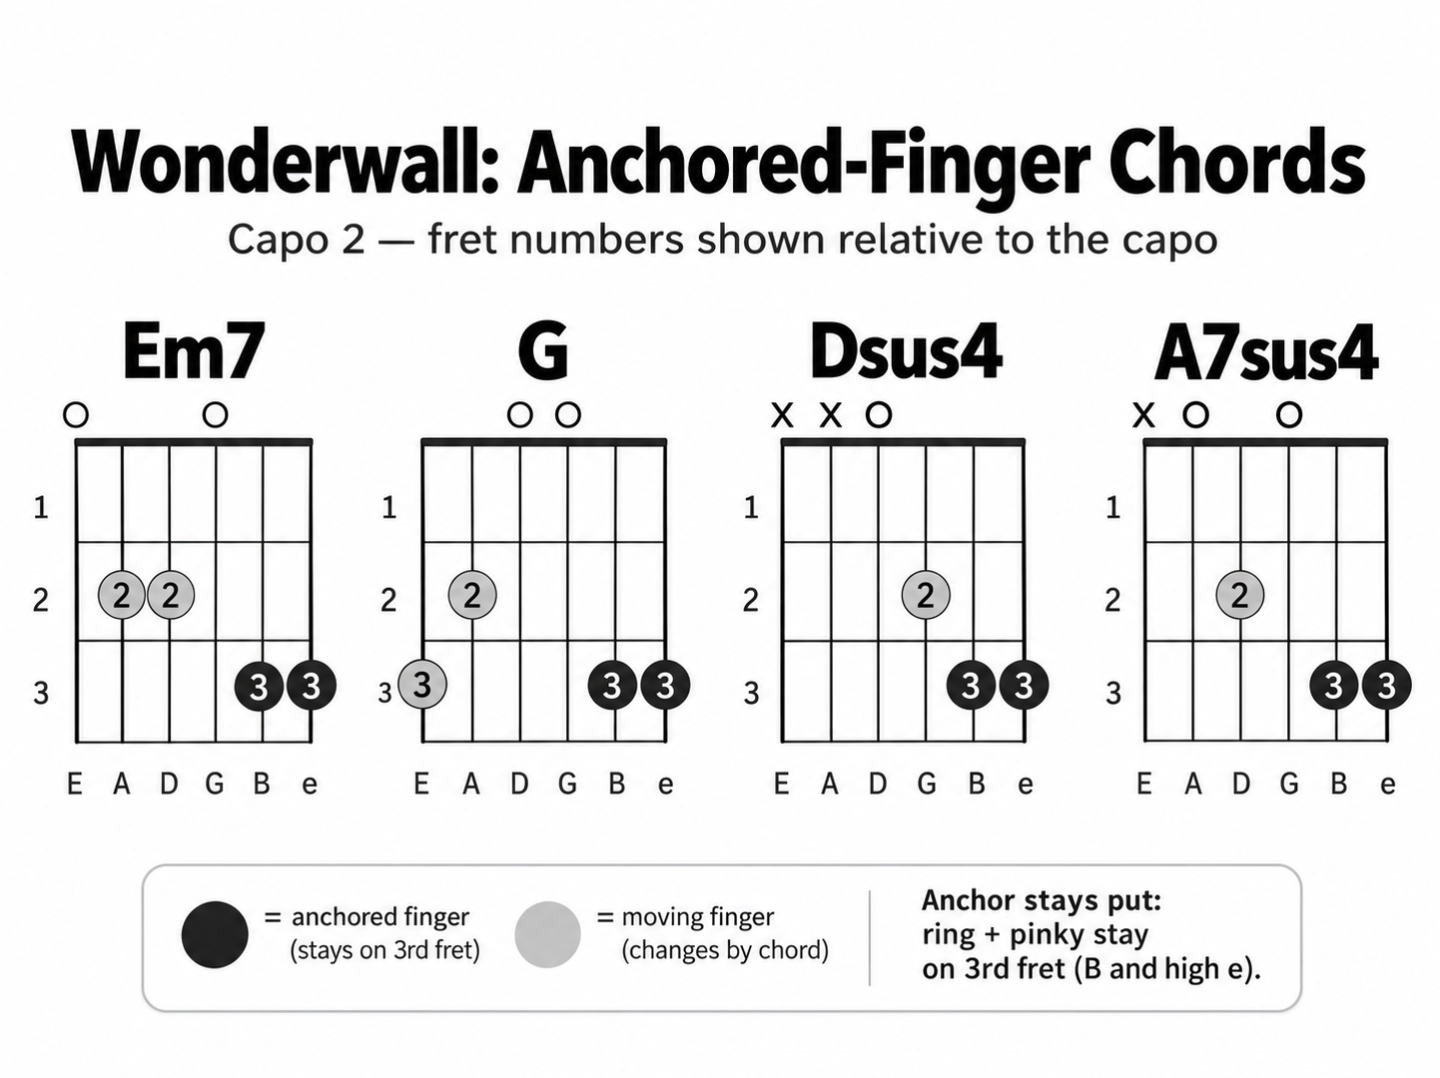
So we have our bottom two fingers locked in place, and then the fingers we’re going to move around.
Getting from one to the next
For that first chord, those moving fingers sit on the strings above and below each other. Not the low E string, but the A and the D both have fingers pressing in, with the middle finger on top of the lower one.
Moving to the G. We move both of those fingers up a string, and move the middle finger over a fret.
Imagine you just come up with both fingers and then move the middle finger over. There’s your G.
Again, the bottom fingers didn’t move. Keep that consistency going, because here comes the D.
Moving to the D. We jump from the G down to the D.
This D is not your standard D. Playing it the standard way is not going to kill anybody, and it won’t hurt, but it’s not going to feel good either. It fights everything else you’re doing.
So keep that bottom finger down. We’re going to use our pointer finger as the mover for these last two chords.
There’s the D. Then jump up a string, and that’s your A.
One note on both of those. We don’t want to hear the low E string. I usually use my thumb to block off that top note. For both the D and the A, you shouldn’t hear it.
The intro
The song starts with those chords four times through.
Play them four times before any singing starts and you’ll feel it immediately. You know this song. You’ll get the vibe within a bar or two.
The verse and the walk down
The next part involves the C add 9, the D we already know, and an E minor.
Play C, D, E minor, C, and do that twice.
Then on the line “there are many things that I would like to say to you,” instead of hitting the E minor, this is where we do the walk down. You can hear it in the record, and it’s the bit that makes people look up.
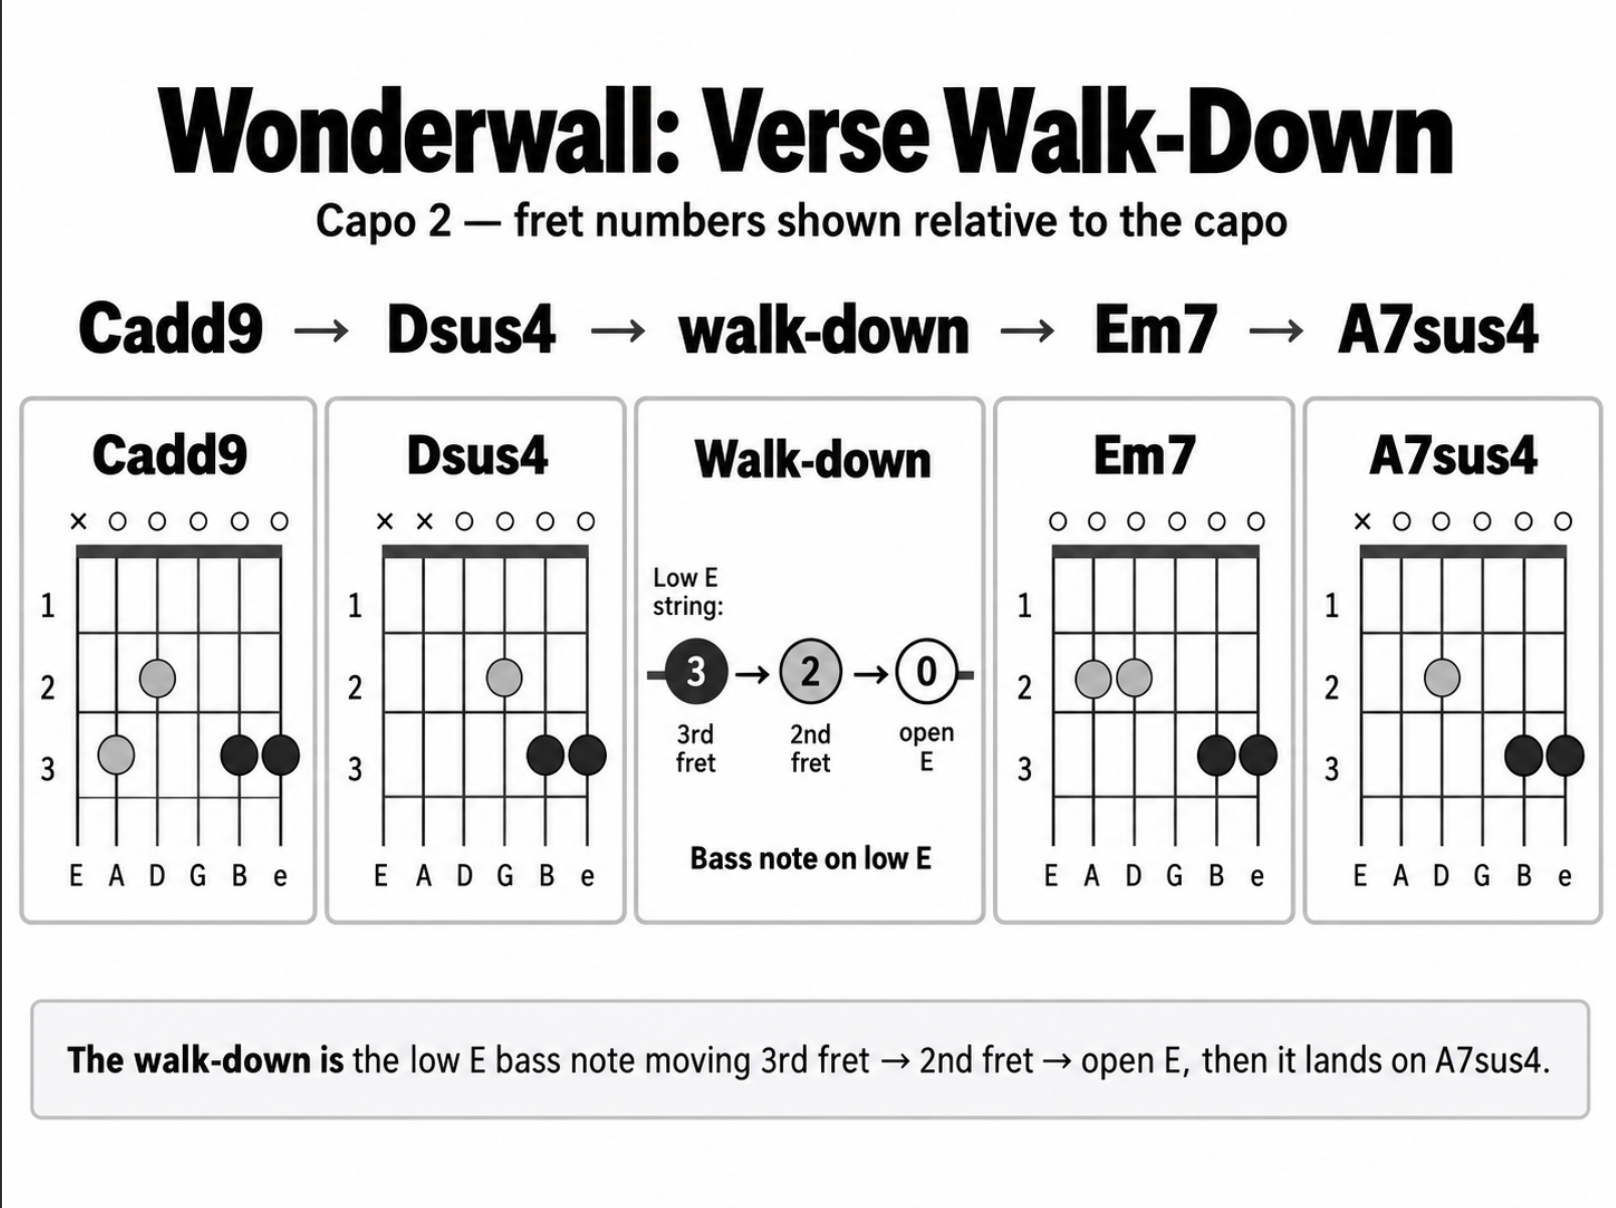
It’s almost the G, but we’re using the middle finger to highlight a couple of notes. So that’s the 3rd fret, then the 2nd on the big thick E string. Then we make that fourth chord an E minor where all the strings get hit.
Then we hit the A7 sus 4 on “but I don’t know how.”
That A7sus4 is the chord that leaves everything hanging. It doesn’t resolve, which is exactly why the chorus lands the way it does when it finally arrives.
The chorus
The chorus comes in with a quicker chord progression pattern.
C, E minor, G, E minor. And it’s only about two rhythmic beats per chord, so it moves.
At the end of the chorus he just kind of hangs on the E minor before anything else happens.
So the run is C, E minor, G, E minor, C, C, E minor, E minor. Then “after all, you’re my wonderwall,” and it hangs there until the next part of the song.
That’s pretty much all the chords.
Now the rhythm, which is the real work
How does he play it? So relaxed.
It’s not exactly the first rhythm you learn, the one where you go down, down up, up down up. It’s kind of an elongated version of that.
I’m not sure I can teach you rhythm entirely in one lesson. Your right hand, and how well you can transition between these chords, is on you. But here’s the shape of it.
You’re going to constantly be moving up and down. There’s no stopping that. It’s just about choosing when you want to hit the strings. You can hit on every stroke or you can skip them, and that’s kind of the beauty of it.
I like starting with three downs. One, two, three. No upstrokes there.
And I use my palm to mute the strings as I go through, just resting it on the strings so it’s not quite so heavy. By the time you lift your hand, it already lets that mute end.
Writing the pattern out
Bare bones, it’s:
Down, down, down, up, down, up, down, up, down. Then up, down, up, down, down, up, down.
To get back around, you do a quick down up before the three downs again.
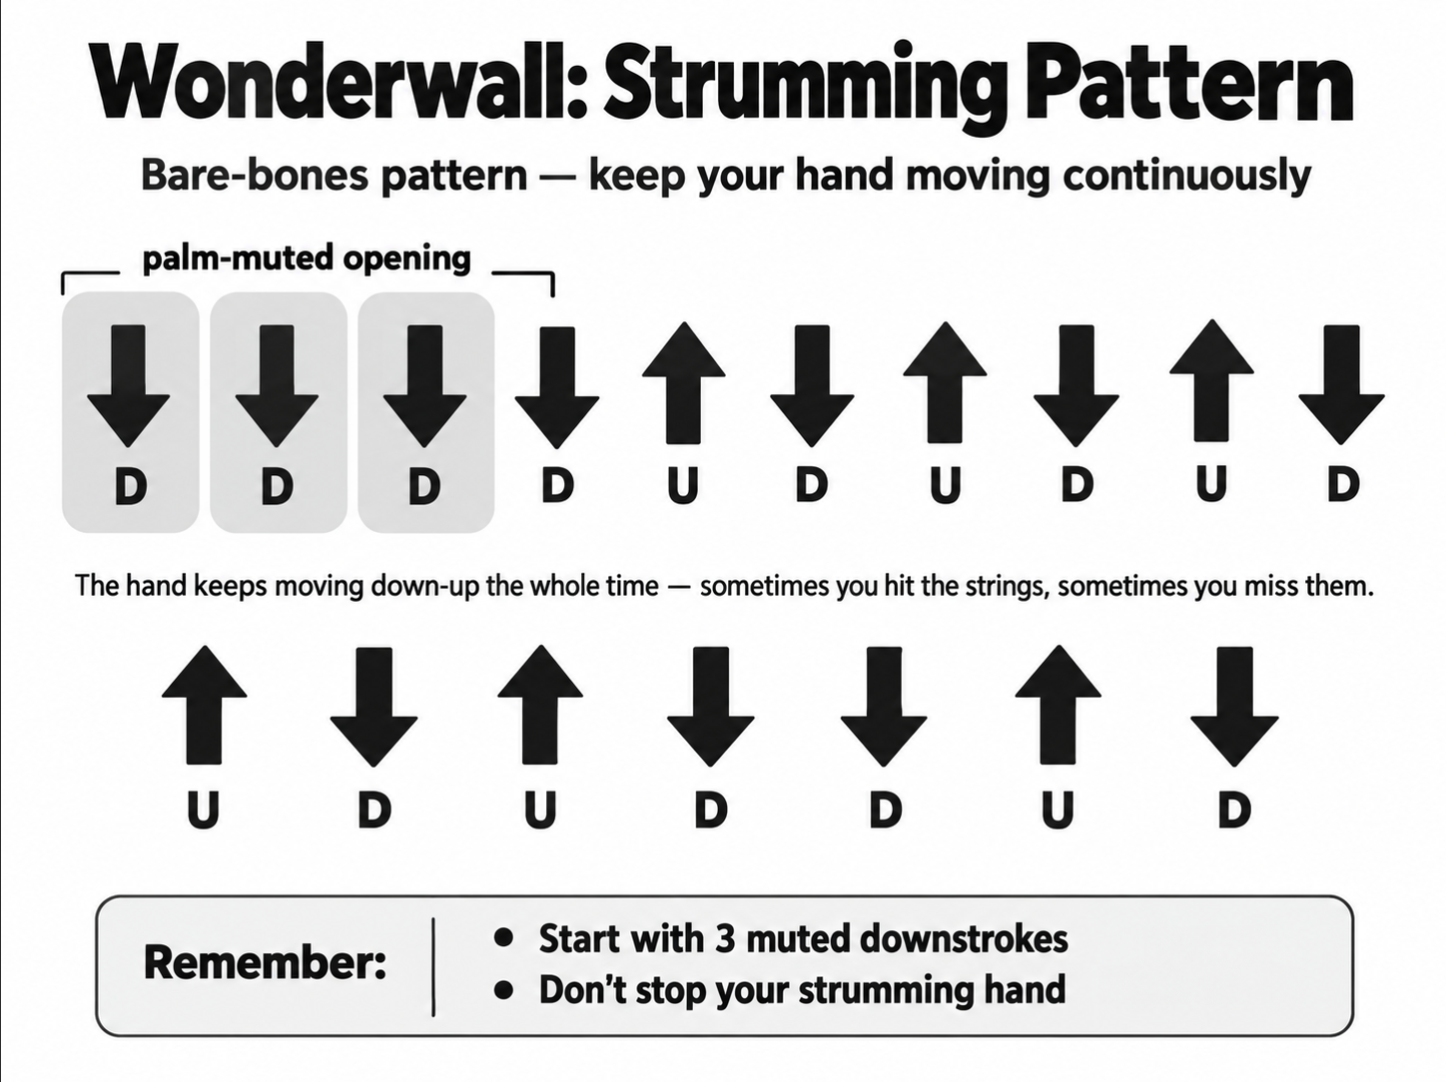
You’re probably going to have to write that out. That’s fine, most people do.
Live, I work in a few more upstrokes to lean on the fact that the rhythm is elongated. It’s not stiff. It’s suspended, and the way you strum up on the backstrokes is what keeps it moving. There’s a lot of palm muting going on in there too.
If your version sounds stiff and the record doesn’t, it’s almost never the chords. It’s that you’re stopping your hand between strums. Keep the hand going and just miss the strings when you don’t want them.
About the capo
We played this with a capo on the second fret and worked from there.
You don’t need a capo for this song, especially if you have a deeper voice. The capo is just going to help you sing it where you actually want to sing it.
You can play it wherever you want on the fretboard. The second fret is just where they play it on the record.
If you’re not sure where to put it for your own voice, try it with no capo first, sing the chorus, and then move up a fret at a time until it stops feeling like a reach. That’s your fret.
The song structure
Here’s the full map so you know where you are:
- Intro, the four chords, four times through
- Verse one
- Pre-chorus, the walk down into the A7sus4
- Chorus
- Verse two
- Pre-chorus
- Chorus
- Bridge, which is the chorus chords again
- Final chorus, twice through
- Outro, hanging on the E minor
The reason it feels longer than it is on paper is that the chorus chords move at double the speed of the verse. Same four shapes, half the time each. If you lose your place anywhere, that speed change is usually where it happened.
Common mistakes
- Using a standard D shape. It breaks the anchor and makes the changes clumsy
- Letting the low E ring on the D and the A
- Moving the ring and pinky. They live on the 3rd fret all song
- Stopping your strumming hand between chords. That’s what makes it sound stiff
- Playing it too fast. This song is patient
If you’re going to sing it
Most people learning this song want to sing it, so one piece of advice.
Get the strumming hand completely automatic before you add the voice. Not “pretty good,” automatic. The moment you start singing, your right hand gets whatever attention is left over, and if the pattern still needs thinking about, it collapses into four flat downstrokes.
The fix is boring and it works. Play the progression on a loop while you do something else. Watch something. Talk to somebody. When you can hold a conversation and keep strumming, you’re ready to sing over it.
What to practice first
1. The four chords with the ring and pinky anchored, no strumming, just switching
2. The same four chords with a simple down strum on each
3. The three downs with palm muting
4. The full pattern, slowly
5. The verse walk down
6. The chorus, which moves twice as fast
That’s my brief description of how to play that song. Hope that was helpful.
If you’ve got questions, come find us in the community.